A how to of beach waves… no matter what your hair type
Beach waves are Summer in a hair style; the disheveled, salty texture is perfect for that off duty, surfer girl vibe that we love while on holiday.
Though appearances can be deceptive,if you have to battle your natural texture to get waves that work then the effortless tousle can actually take a lot more energy and styling time than the look would have you believe…
The beach waves of today are disheveled and look best when tailored to our natural hair type whether that be big, loose waves or a more kinky, mermaid style texture. Our nifty guide will help you achieve beach waves no matter what your hair type so read on to be holiday ready!


Recommended Product: ENDLESS CONTROL
Hair controller & flexible restyling fluid wax
Creates controlled, gelled styles with 24-hour hold.
& texturized looks that can be styled and restyled all day.
No residue. No stickiness. Fluid gel texture turns to wax when drying. For use on wet and dry hair.
FOR WAVES AND CURLS
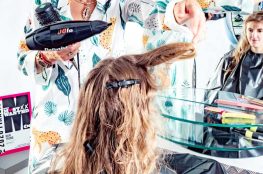
If you have tight curls or waves it’s about trying to lengthen them by stretching rather than scrunching them into a bigger, curlier cloud. Take sections of hair, larger for looser waves and massage product into it so that the waves look polished when finished.
Begin the styling when your hair is damp and pull product through the mid lengths and ends. Pull your curls down with the product so that as it air-dries there is enough weight for them to be stretched. If you don’t have time for air-drying then go for a rough dry on cool, do NOT blast your hair on hot or full power because this will cause major fly aways. Use your fingers and drag the hair longways until dry and tame any fly away pieces with a hair wand.
FOR FINE HAIR
The toughest part of getting beach waves in fine hair is that you need product for volume and life but you do not want to weigh the hair down. Start with damp, towel dried hair and moisturize it with a spray from root to end.
Next use your sea-salt or texturing lotion and add about 2 pumps to the mid section and scrunch it, avoiding the ends. This is the only part of your hair that needs scrunching.
With finer hair do a bit of rough drying to get the hair off the scalp by lifting the roots away from your head with your fingers or a diffuser. When about 30% of the hair remains damp split the hair into two twisted buns and get the diffuser in them to dry on a medium heat and mid-low power. Shake them out and voila!
FOR THICK, STRAIGHT HAIR
The method is the same to fine hair but you need a product with more hold to support the weight of your locks. A heavy mousse will help add hold and a light touch with a thick curling wand will help add shape to any stubborn, straight ends. Use them to enhance what you have created and pick up any sections at random to add to the under-styled vibe.
CURLY OR FRIZZY HAIR
If you have coarse or frizzy hair then going for a salty, texturised style means that you need to moisturise the hair first to soften before adding the salt or the hair will appear over dry. Extra product is needed for the crown of the head, more moisture means more stick so concentrate your application to the mid-section of your hair and add it also to your hairline and parting to control any fly away or rebellious strands. Rough drying is often used to create more volume and texture which is the opposite of what you want so work your way carefully and slowly with the blow-dryer on a mid heat and low power, pointing the nozzle downwards so as not to ruffle any hair fibres.
For more on styling click here!